此示例工程以Storm+Flume+Kafka分布式集群为运行环境,搭建日志流式处理平台,实时解析访问日志,统计、监控服务访问,是之前一篇Storm实战的完善和补充。
说明
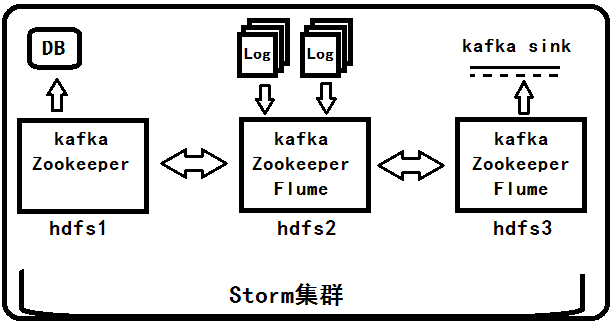
该示例运行环境的搭建,在本博客的相关文章均有介绍,示例的环境架构如下图所示,日志信息由Flume集群收集并统一发放到Kafka集群,再由Storm集群读取处理(只有三台虚拟机进行集群模拟)。

编码
结构分析
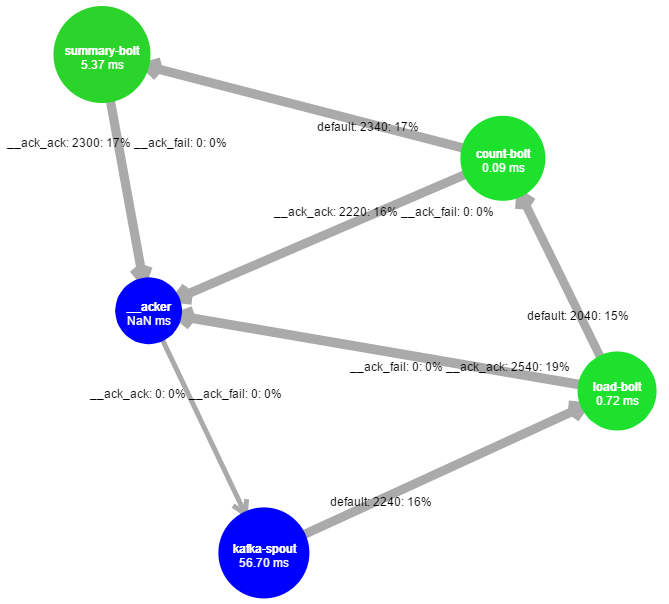
该示例较为简单,主要分为三类Bolt,即Load、Count、Summary(或Collect)负责数据的加载解析、统计分析、汇总存储。结构如图:

工具的选取
取操作最为频繁的调用,作为静态工具单独编写,例如:数据的解析、存储等。
本示例使用Gson解析日志行为PO对象,而数据写入则由于SummaryBolt并行度约定为1,使用全局PrepareStatement对象以免去不必要的对象生成,提升性能。
该部分较为简单,源码可查看我的Github
程序编写
Spout说明
由于使用storm-kafka类库,KafkaSpout将十分简单,只需配置一下SpoutConfig即可。
LoadBolt实现
主要任务就是读取Tuple的数据行,然后使用Gson工具解析为PO对象,根据统计的时间精度生成标识字段以便传递到下一个Bolt时是同一个时段的数据,需要在Bolt顺序声明中指定字段。
1
2
3
4
5
6
7
8
9
10
11
12
13
14
15
16
17
18
| public class LoadBolt extends BaseBasicBolt {
private static final SimpleDateFormat format = new SimpleDateFormat("yyyy-MM-dd-HH");
public void execute(Tuple input, BasicOutputCollector collector) {
String sourceLine = input.getString(0);
if(sourceLine.trim().length() < 1) return;
try {
AccessLog entity = LogParser.parse(sourceLine);
collector.emit(new Values(format.format(entity.getTime_local())+" "+entity.getRequest_url(),
entity));
}catch (JsonParseException ex){
}
}
public void declareOutputFields(OutputFieldsDeclarer declarer) {
declarer.declare(new Fields("id","entity"));
}
}
|
CountBolt实现
统计当前时段的PageView数量和UserView数量,同时包括一些状态信息、最多访问的信息等,此处较为灵活,按需编写即可。
1
2
3
4
5
6
7
8
9
10
11
12
13
14
15
16
17
18
19
20
21
22
23
24
25
26
27
28
29
30
31
32
33
34
35
36
37
38
39
40
41
42
43
44
45
46
47
48
49
50
51
52
53
54
55
56
57
58
59
60
61
62
63
64
65
66
67
68
69
70
71
| public class CountBolt extends BaseBasicBolt {
private Map<String, Integer> counter = null;
private Map<String, Integer> status = null;
private Map<String, Integer> method = null;
private String pvKey = "pv";
@Override
public void prepare(Map stormConf, TopologyContext context) {
counter = new HashMap<String, Integer>();
status = new HashMap<String, Integer>();
method = new HashMap<String, Integer>();
super.prepare(stormConf, context);
}
private void countPvUvByIp(AccessLog entity){
Integer pv = counter.get(pvKey);
if(pv == null){
pv = 0;
}
counter.put(pvKey, ++ pv);
String uvKey = "_uv";
if(!counter.containsKey(entity.getRemote_addr()+ uvKey)){
counter.put(entity.getRemote_addr()+ uvKey, 1);
}
}
private void countStatus(AccessLog entity){
Integer pv3xx = status.get("3xxPv");
Integer pv4xx = status.get("4xxPv");
Integer pvOther = status.get("otherPv");
String stat = String.valueOf(entity.getStatus());
if(stat.startsWith("3"))
status.put("3xxPv", pv3xx == null? 1:++ pv3xx);
else if(stat.startsWith("4"))
status.put("4xxPv", pv4xx == null? 1:++ pv4xx);
else
status.put("otherPv", pvOther == null? 1:++ pvOther);
String mKey = entity.getRequest_method() + " " +entity.getRemote_addr();
Integer mCount = method.get(mKey);
if(mCount == null){
mCount = 0;
}
method.put(mKey, ++ mCount);
}
private int safeGet(Map<String,Integer> map, String key){
return map.get(key) == null ? 0: map.get(key);
}
public void execute(Tuple input, BasicOutputCollector collector) {
AccessLog entity = (AccessLog) input.getValueByField("entity");
String timeId = input.getValueByField("id").toString().split(" ")[0];
countPvUvByIp(entity);
countStatus(entity);
String maxMethod = "";
int maxMethodCount = 0;
for(String key : method.keySet()){
if(method.get(key) > maxMethodCount){
maxMethodCount = method.get(key);
maxMethod = key;
}
}
String[] temp = maxMethod.split(" ");
collector.emit(new Values(timeId, entity.getRequest_url(), counter.get(pvKey), counter.size() - 1,
safeGet(status, "4xxPv"), safeGet(status, "3xxPv"), safeGet(status, "otherPv"),
temp[0], temp[1]));
}
public void declareOutputFields(OutputFieldsDeclarer declarer) {
declarer.declare(new Fields("time","resource","pv","uv","4xxPv",
"3xxPv","otherPv","maxMethod", "maxUser"));
}
}
|
SummaryBolt实现
只是对CountBolt的输出进行汇总存储,按字段取出,写入数据库即可,并行度可根据需要调整(同时需要注意数据写入工具的并发实现)。
1
2
3
4
5
6
7
8
9
10
11
12
13
14
15
16
17
18
19
20
21
22
23
24
25
26
27
28
29
30
31
32
| public class SummaryBolt extends BaseBasicBolt {
private String url,username,password,tabname;
@Override
public void prepare(Map stormConf, TopologyContext context) {
url = stormConf.get("mysql.url").toString();
username = stormConf.get("mysql.username").toString();
password = stormConf.get("mysql.password").toString();
tabname = stormConf.get("mysql.tablename").toString();
super.prepare(stormConf, context);
}
public void execute(Tuple input, BasicOutputCollector collector) {
String time = input.getStringByField("time");
String resource = input.getStringByField("resource");
int pv = input.getIntegerByField("pv");
int uv = input.getIntegerByField("uv");
int pv4xx = input.getIntegerByField("4xxPv");
int pv3xx = input.getIntegerByField("3xxPv");
int otherPv = input.getIntegerByField("otherPv");
String maxMethod = input.getStringByField("maxMethod");
String maxUser = input.getStringByField("maxUser");
DBWriter.write(url, username, password, tabname, time,resource,pv,uv,pv3xx,pv4xx,otherPv,maxMethod,maxUser);
}
@Override
public void cleanup() {
DBWriter.close();
super.cleanup();
}
public void declareOutputFields(OutputFieldsDeclarer declarer) {
}
}
|
主类实现
流程很简单:加载配置信息→配置KafkaSpout→Bolt的安排→准备Topology→提交Topology
需要注意的部分已在代码注释处标明。
1
2
3
4
5
6
7
8
9
10
11
12
13
14
15
16
17
18
19
20
21
22
23
24
25
26
27
28
29
30
31
32
33
34
35
36
37
38
39
40
41
42
43
| public class Program {
public static void main(String[] args) {
Properties properties = loadProperties("config.properties");
SpoutConfig kafkaConfig = new SpoutConfig(new ZkHosts(properties.getProperty("zookeeper.server")),
properties.getProperty("kafka.topic"),"/mystorm","access");
kafkaConfig.scheme = new SchemeAsMultiScheme(new StringScheme());
TopologyBuilder builder = new TopologyBuilder();
builder.setSpout("kafka-spout", new KafkaSpout(kafkaConfig));
builder.setBolt("load-bolt", new LoadBolt(),6).shuffleGrouping("kafka-spout");
builder.setBolt("count-bolt", new CountBolt(),6).fieldsGrouping("load-bolt", new Fields("id"));
builder.setBolt("summary-bolt", new SummaryBolt(), 1).shuffleGrouping("count-bolt");
Config config = new Config();
config.setMaxSpoutPending(10);
config.setNumWorkers(1);
config.setMaxTaskParallelism(10);
config.put(Config.TOPOLOGY_TRIDENT_BATCH_EMIT_INTERVAL_MILLIS, 1000);
config.put("mysql.url", properties.getProperty("mysql.url"));
config.put("mysql.username", properties.getProperty("mysql.username"));
config.put("mysql.password", properties.getProperty("mysql.password"));
config.put("mysql.tablename", properties.getProperty("mysql.tablename"));
StormTopology topology = builder.createTopology();
try {
StormSubmitter.submitTopology(properties.getProperty("topology.name"), config, topology);
} catch (Exception e) {
e.printStackTrace();
}
}
private static Properties loadProperties(String fileName){
Properties prop = new Properties();
try {
prop.load(Program.class.getClassLoader().getResourceAsStream(fileName));
} catch (IOException e) {
System.err.println("Missing config file : "+fileName);
System.exit(1);
}
return prop;
}
}
|
部署运行
数据库搭建
创建指定的用户,例如:创建名为vica的网络用户,对数据库accesslog_count拥有所以控制权
1
| grant all privileges on `accesslog_count`.* to 'vica'@'%' identified by 'xxxxxx';
|
然后为其创建数据库和表:
1
2
3
4
5
6
7
8
9
10
11
12
13
14
15
16
|
CREATE DATABASE accesslog_count;
USE accesslog_count;
CREATE TABLE `t_count`(
`time` VARCHAR(15) NOT NULL ,
`resource` VARCHAR(240) NOT NULL ,
`page_view` INT NOT NULL ,
`user_view` INT NOT NULL ,
`pv_3` INT NOT NULL ,
`pv_4` INT NOT NULL ,
`pv_other` INT NOT NULL ,
`max_method` VARCHAR(12) NOT NULL ,
`max_user` VARCHAR(16) NOT NULL ,
PRIMARY KEY (`time`, `resource`)
);
|
数据准备
为模拟日志的实时产生,将提前下载好的access日志分割开来,然后按指定时间输出日志行。
使用命令wc -l查看当前日志文件的行数,例如该示例所使用的原文件为27311行,使用命令split -l 15000 access.log part-将该文件分割成两个文件(part-aa和part-ab),前者拥有15000行数据,后者则有剩下的12311行。
环境准备
使用Maven对写好的程序进行打包(pom.xml稍后会在文章末尾放出)并上传到集群某主机。
- 启动Zookeeper集群,使用命令
./bin/zkServer.sh start
- 启动Nimbus,使用命令
storm nimbus &
- 启动Supervisor,使用命令
storm supervisor &
- 启动Kafka,使用命令
./bin/kafka-server-start.sh config/server.properties &
- 创建话题,使用命令
./bin/kafka-topics.sh -zookeeper hdfs1:2181,hdfs2:2181,hdfs3:2181 -topic flume-topic -replication-factor 1 -partitions 1 -create
- 启动Flume,使用命令
flume-ng agent -n <agent名称> -f conf/kafka-sink.conf -Dflume.root.logger=INFO,console
以上命令和配置均可在本博客找到相关文章的描述,Flume日志采集及KafkaSink的配置可在《分布式集群手操 – Flume搭建 Flume+Kafka的例子》中找到。
部署Topology,使用命令storm jar <jar文件> <主类>,即可。
然后启动模拟数据生产,./line.sh part-aa 0.1 >> access.log,该脚本指定每隔0.1s输出part-aa文件数据行。该脚本代码如下:
line.sh1
2
3
4
5
6
7
8
| #!/bin/sh
filename=$1
time=$2
while read LINE
do
echo $LINE
sleep $time
done < $filename
|
检视运行
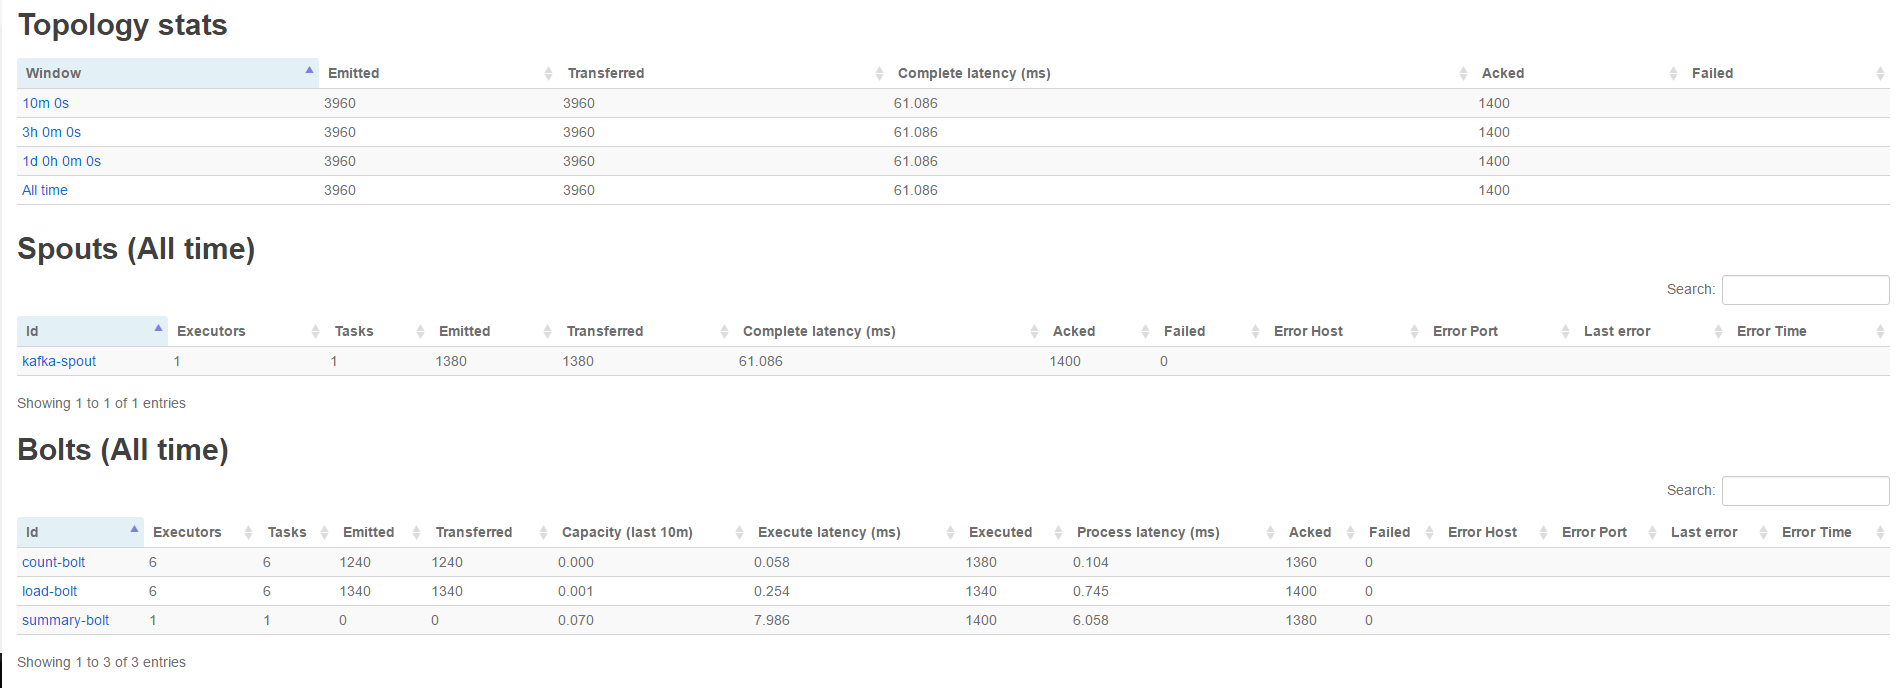
在Nimbus端启动UI组件(命令:storm ui &),访问其8080端口可查看运行中的Topology的相关信息,如下图:

展开查看图示,更为直观:

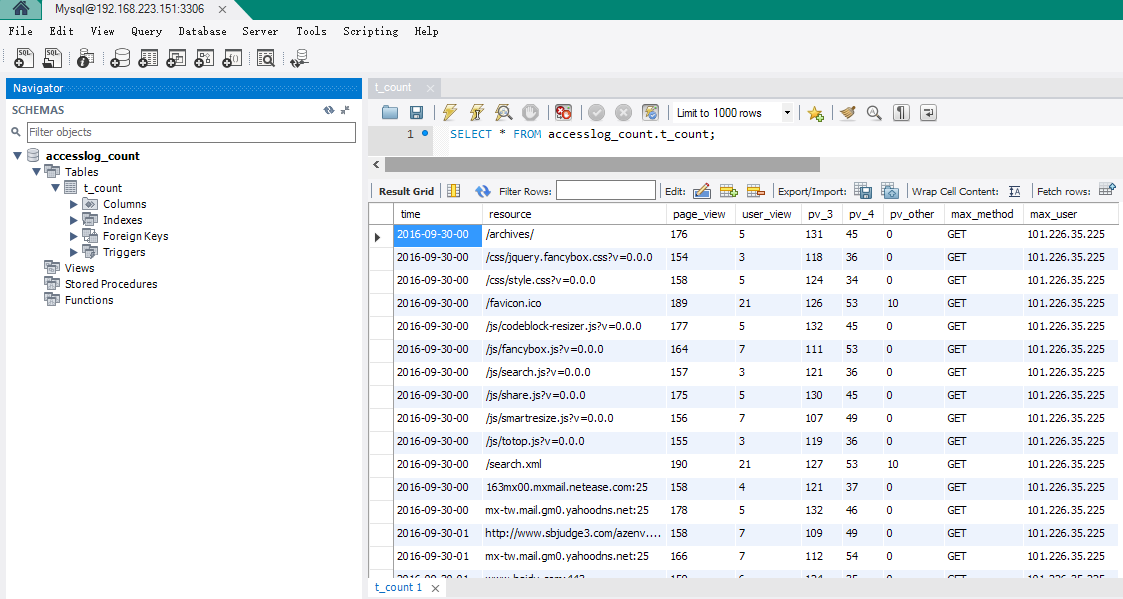
在本地端连接数据库,查看已统计的信息:

至此,本示例已结束。
附录
pom.xml1
2
3
4
5
6
7
8
9
10
11
12
13
14
15
16
17
18
19
20
21
22
23
24
25
26
27
28
29
30
31
32
33
34
35
36
37
38
39
40
41
42
43
44
45
46
47
48
49
50
51
52
53
54
55
56
57
58
59
60
61
62
63
64
65
66
67
68
69
70
71
72
73
74
75
76
77
78
| <?xml version="1.0" encoding="UTF-8"?>
<project xmlns="http://maven.apache.org/POM/4.0.0"
xmlns:xsi="http://www.w3.org/2001/XMLSchema-instance"
xsi:schemaLocation="http://maven.apache.org/POM/4.0.0 http://maven.apache.org/xsd/maven-4.0.0.xsd">
<modelVersion>4.0.0</modelVersion>
<groupId>me.vica.storm</groupId>
<artifactId>AccessLogger</artifactId>
<version>1.0</version>
<dependencies>
<dependency>
<groupId>log4j</groupId>
<artifactId>log4j</artifactId>
<version>1.2.17</version>
</dependency>
<dependency>
<groupId>org.apache.storm</groupId>
<artifactId>storm-core</artifactId>
<version>1.0.2</version>
<scope>provided</scope>
</dependency>
<dependency>
<groupId>org.apache.kafka</groupId>
<artifactId>kafka_2.10</artifactId>
<version>0.10.0.1</version>
<scope>compile</scope>
<exclusions>
<exclusion>
<groupId>org.apache.zookeeper</groupId>
<artifactId>zookeeper</artifactId>
</exclusion>
<exclusion>
<groupId>org.slf4j</groupId>
<artifactId>slf4j-log4j12</artifactId>
</exclusion>
</exclusions>
</dependency>
<dependency>
<groupId>org.apache.storm</groupId>
<artifactId>storm-kafka</artifactId>
<version>1.0.2</version>
</dependency>
<dependency>
<groupId>mysql</groupId>
<artifactId>mysql-connector-java</artifactId>
<version>5.1.37</version>
<scope>runtime</scope>
</dependency>
<dependency>
<groupId>com.google.code.gson</groupId>
<artifactId>gson</artifactId>
<version>2.2.4</version>
</dependency>
</dependencies>
<build>
<plugins>
<plugin>
<groupId>org.apache.maven.plugins</groupId>
<artifactId>maven-shade-plugin</artifactId>
<version>2.3</version>
<executions>
<execution>
<phase>package</phase>
<goals>
<goal>shade</goal>
</goals>
<configuration>
<transformers>
<transformer implementation="org.apache.maven.plugins.shade.resource.ManifestResourceTransformer">
<mainClass>me.vica.Program</mainClass>
</transformer>
</transformers>
</configuration>
</execution>
</executions>
</plugin>
</plugins>
</build>
</project>
|


