此示例工程在上一篇关于Storm集群搭建的博文中提到,运行环境即为Storm+Kafka分布式集群环境,主要应用流式处理,实时解析Nginx访问日志,一般用于PV、UV统计及访问监控。该示例也起到举一反三的作用。Storm常被用于实时分析、在线机器学习、持续计算、分布式远程调用和ETL等领域。
场景描述
需要实时解析Nginx集群站点的访问日志,以供实时的访问分析、入侵检测、动态调整等。通过Kafka消息队列将新的访问记录传递到Storm集群,从消息队列中消费这些访问记录并解析存储,以供下一步分析。
场景搭建/模拟
通过编写shell脚本,动态生成“访问日志”,以模拟此次实践环境。
思路
取nginx访问日志的记录模板,通过随机数据替换关键部分信息,并将生成的模拟记录追加到文件中。
实现
logger.sh1
2
3
4
5
6
7
8
9
10
11
12
| int=1
while(( $int<=1000000000 ))
do
rand=$(date +%N)
ips=$((10#$rand%253+1))
dates=`date +'%d/%b/%y:%H:%M:%S %z'`
log="{ \"time_local\": \"$dates\", \"remote_addr\": \"182.92.77.$ips\", \"remote_user\": \"-\", \"body_bytes_sent\": \"5760\", \"request_time\": \"0.005\", \"status\": \"200\", \"request\": \"GET /jiayouserver/www/index.php\", \"request_method\": \"GET\", \"http_referrer\": \"-\", \"body_bytes_sent\":\"5760\", \"http_x_forwarded_for\": \"-\", \"http_user_agent\": \"Wget/1.12 (linux-gnu)\" }"
let "int++"
echo $log >> access.log
# echo $log
sleep 1s
done
|
如上代码,变量rand为当前时间的纳秒数,以此变量为基础生成随机访问IP的主机地址,dates变量则为格式化的当前时间字符串,每秒生成一条记录。由于使用系统时间产生的随机数分布很均匀,在后面的PV、UV统计中,数据会呈现基本持平的状态,可通过增加概率系数调整这一分布水平使得数据看起来更真实。
以上代码保存为logger.sh文件,使用命令 ./logger.sh 2>&1 &运行后台任务模拟nginx服务器。
着手实现
通信队列
在模拟的nginx服务器目录下生成的access.log文件会在每秒追加一条记录。
创建新话题
1
| bin/kafka-topics.sh -zookeeper hdfs1:2181,hdfs2:2181,hdfs3:2181 -partitions 1 -replication-factor 1 -topic accesslog -create
|
创建生产者
1
| tail -f ~/accesslog/access.log | bin/kafka-console-producer.sh -broker-list hdfs1:9092,hdfs2:9092,hdfs3:9092 -topic accesslog &
|
storm解析
使用IDEA新建一个Maven项目,在pom.xml中添加以下依赖:
pom.xml1
2
3
4
5
6
7
8
9
10
11
12
13
14
15
16
17
18
19
20
21
22
23
24
25
26
27
28
29
30
31
32
33
34
35
36
37
38
39
40
41
42
43
44
45
46
47
48
49
50
51
52
53
54
55
56
57
58
59
60
61
62
63
64
65
66
67
68
69
70
71
| <dependency>
<groupId>junit</groupId>
<artifactId>junit</artifactId>
<version>4.11</version>
</dependency>
<dependency>
<groupId>org.apache.storm</groupId>
<artifactId>storm-core</artifactId>
<version>1.0.2</version>
<scope>provided</scope>
</dependency>
<dependency>
<groupId>org.apache.storm</groupId>
<artifactId>storm-kafka</artifactId>
<version>1.0.2</version>
<exclusions>
<exclusion>
<groupId>org.apache.kafka</groupId>
<artifactId>kafka-clients</artifactId>
</exclusion>
<exclusion>
<groupId>org.slf4j</groupId>
<artifactId>slf4j-api</artifactId>
</exclusion>
</exclusions>
</dependency>
<dependency>
<groupId>org.apache.kafka</groupId>
<artifactId>kafka_2.10</artifactId>
<version>0.10.0.1</version>
<scope>compile</scope>
<exclusions>
<exclusion>
<groupId>org.apache.zookeeper</groupId>
<artifactId>zookeeper</artifactId>
</exclusion>
<exclusion>
<artifactId>jmxri</artifactId>
<groupId>com.sun.jmx</groupId>
</exclusion>
<exclusion>
<artifactId>jms</artifactId>
<groupId>javax.jms</groupId>
</exclusion>
<exclusion>
<artifactId>jmxtools</artifactId>
<groupId>com.sun.jdmk</groupId>
</exclusion>
<exclusion>
<groupId>org.slf4j</groupId>
<artifactId>slf4j-log4j12</artifactId>
</exclusion>
<exclusion>
<groupId>org.slf4j</groupId>
<artifactId>slf4j-api</artifactId>
</exclusion>
<exclusion>
<groupId>log4j</groupId>
<artifactId>log4j</artifactId>
</exclusion>
<exclusion>
<groupId>junit</groupId>
<artifactId>junit</artifactId>
</exclusion>
</exclusions>
</dependency>
<dependency>
<groupId>com.google.code.gson</groupId>
<artifactId>gson</artifactId>
<version>2.2.4</version>
</dependency>
|
分别是单元测试、storm核心依赖包、storm-kafka消息队列依赖包及gson解析包,这些依赖关系中存在较多版本冲突、依赖重复等问题,需要指定剔除部分依赖。
在国内可能无法下载到相关依赖包(尤其像storm核心包如此庞大的体型),此时需要手动安装该依赖包。以storm的核心包为例:
使用压缩软件从下载的storm-1.02的安装包中拷出storm-core-1.02.jar文件(在lib目录下)到本地磁盘,例如F盘。
运行命令行,切换到该jar文件所在目录(为方便),使用以下命令安装jar包到maven仓库:
1
| mvn install:install-file -DgroupId=org.apache.storm -DartifactId=storm-core -Dversion=1.0.2 -Dfile=storm-core-1.0.2.jar -Dpackaging=jar
|
然后重新加载依赖即可。
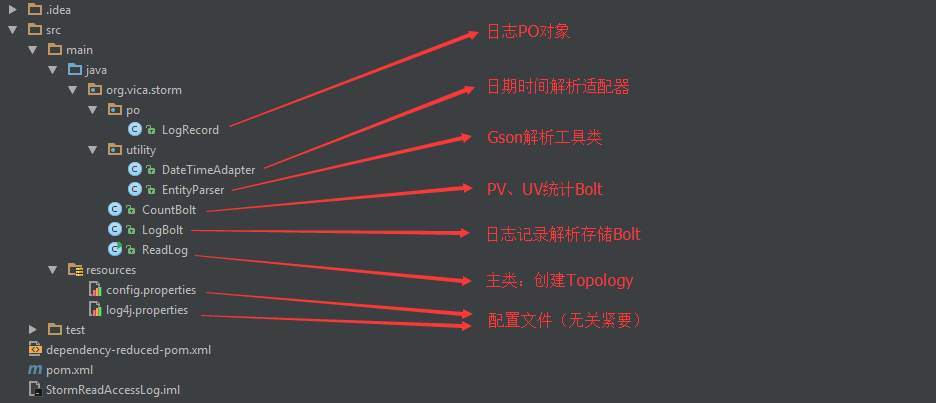
编写代码,主要分为四步:
- 从Kafka消息队列取消息
- 将消息字符串通过Gson解析为PO日志对象,此时可存储数据库(方法简单,不罗嗦了)
- 分字段传递消息到下一个Bolt
- 分字段统计PV、UV信息
所以,项目结构如下:

关键代码,主要为两个Bolt和主类:
LogBolt.Java1
2
3
4
5
6
7
8
9
10
11
12
13
14
15
16
17
18
19
20
21
22
23
24
25
26
27
28
| private SimpleDateFormat format = new SimpleDateFormat("yyyy-MM-dd HH:mm");
@Override
public void prepare(Map stormConf, TopologyContext context) {
String mysqlUrl = stormConf.get("mysql.url").toString();
String username = stormConf.get("mysql.username").toString();
String password = stormConf.get("mysql.password").toString();
initConnection(mysqlUrl,username,password);
super.prepare(stormConf, context);
}
public void execute(Tuple input, BasicOutputCollector collector) {
String line = input.getString(0);
if(line.trim().length()<1)
return;
LogRecord record = EntityParser.parse(line );
writeDb(record);
collector.emit(new Values(format.format(record.getTime_local()),record.getRemote_addr(),String.valueOf(record.getStatus()),
String.valueOf(record.getBody_bytes_sent()),record.getRequest(),record.getHttp_referrer(),record.getHttp_user_agent(),
record.getHttp_x_forwarded_for()));
}
public void declareOutputFields(OutputFieldsDeclarer declarer) {
declarer.declare(new Fields("date", "ip", "status", "body_bytes_sent",
"request", "http_referer", "http_user_agent", "http_x_forwarded_for"));
}
|
在LogBolt类中,输出字段统一为字符串,而时间字符串则只保留到分钟,以便于在统计PV、UV时通过时间字符串实现每分钟的统计而非原始的每秒钟的统计。
CountBlot.Java1
2
3
4
5
6
7
8
9
10
11
12
13
14
15
16
17
18
19
20
21
22
23
24
25
26
27
28
29
30
31
32
33
34
35
36
37
38
39
40
41
42
43
44
45
46
| private Map<String, Integer> all = new HashMap<String, Integer>();
public void execute(Tuple input, BasicOutputCollector collector) {
String date = input.getStringByField("date");
String ip = input.getStringByField("ip");
String status = input.getStringByField("status");
String body_bytes_sent = input.getStringByField("body_bytes_sent");
String request = input.getStringByField("request");
String http_referer = input.getStringByField("http_referer");
String http_user_agent = input.getStringByField("http_user_agent");
String http_x_forwarded_for = input.getStringByField("http_x_forwarded_for");
countPVUVByIP(date,ip);
System.out.println("======================================================");
for(String key : all.keySet()){
System.out.println(key+" = "+all.get(key));
}
}
public void declareOutputFields(OutputFieldsDeclarer declarer) {}
private void countPVUVByIP(String data, String ip){
String ipkey = data+"_"+ip;
String pvkey = data+"_pv";
String uvkey = data+"_uv";
Integer count = all.get(ipkey);
if(count==null){
count = 0;
}
all.put(ipkey, ++count);
Integer pv = all.get(pvkey);
if(pv==null) {
pv = 0;
}
all.put(pvkey,++pv);
if(count<2){
Integer uv =all.get(uvkey);
if(uv==null){
uv=0;
}
all.put(uvkey,++uv);
}
}
|
从上CountBolt类代码,可知通过HashMap进行归类统计数量,实时输出。
ReadLog.Java1
2
3
4
5
6
7
8
9
10
11
12
13
14
15
16
17
18
19
20
21
22
23
24
25
26
27
28
29
30
31
32
33
34
35
36
37
38
39
40
41
42
| public static void main(String[] args) {
Properties prop = new Properties();
try {
prop.load(ReadLog.class.getClassLoader().getResourceAsStream("config.properties"));
} catch (IOException e) {
System.out.println("error: missing config.properties");
e.printStackTrace();
System.exit(1);
}
SpoutConfig config = new SpoutConfig(new ZkHosts(prop.getProperty("zookeeper.server")), prop.getProperty("kafka.topic"),"/bigdata/nginx","nginx-access");
config.scheme = new SchemeAsMultiScheme(new StringScheme());
TopologyBuilder builder = new TopologyBuilder();
builder.setSpout("kafka-spout", new KafkaSpout(config));
builder.setBolt("accesslog-bolt", new LogBolt()).shuffleGrouping("kafka-spout");
builder.setBolt("count-pvuv",new CountBolt(),1).shuffleGrouping("accesslog-bolt");
Config stormConfig = new Config();
stormConfig.setNumWorkers(1);
stormConfig.put(Config.TOPOLOGY_TRIDENT_BATCH_EMIT_INTERVAL_MILLIS, 1000);
stormConfig.setMaxSpoutPending(10);
stormConfig.put("mysql.url",prop.getProperty("mysql.url"));
stormConfig.put("mysql.username",prop.getProperty("mysql.username"));
stormConfig.put("mysql.password",prop.getProperty("mysql.password"));
String topology_name=prop.getProperty("topology.name");
StormTopology topology = builder.createTopology();
if(System.getProperty("os.name").contains("Window")){
LocalCluster cluster = new LocalCluster();
cluster.submitTopology(topology_name,stormConfig,topology);
try {
Thread.sleep(600000000L);
} catch (InterruptedException e) {
e.printStackTrace();
}
}else {
try {
StormSubmitter.submitTopology(topology_name,stormConfig,topology);
} catch (Exception e) {
e.printStackTrace();
}
}
System.exit(0);
}
|
主类Main方法中读取并加载配置文件,该文件定义了运行此Topology所需的一些参数,比如Kafka消息主题、mysql连接信息等。
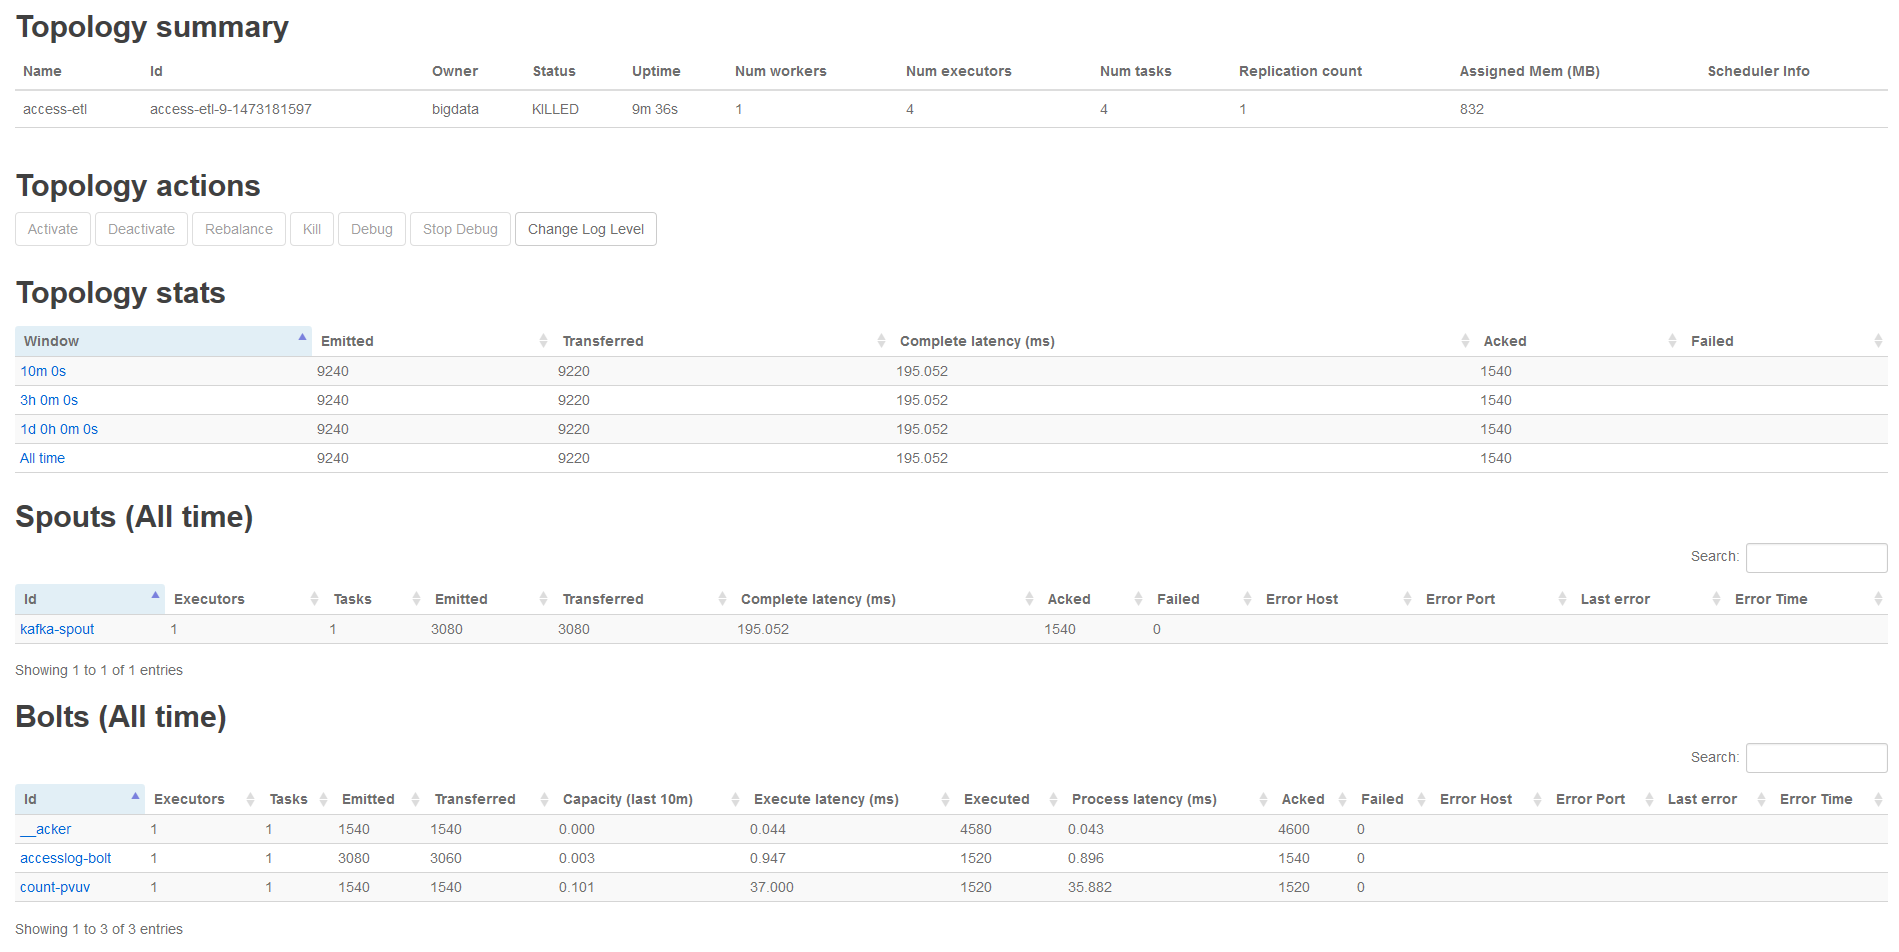
通过maven打jar包,上传到storm集群,并使用 storm jar <jar文件> <主类> 命令提交Topology,成功提交后可在Storm的WebUI查看执行状态:


